
Mecpow X4 Pro Review: 22 Watts on a Budget
The Mecpow X4 Pro is a laser engraver and cutter that uses a powerful 22-watt diode laser to quickly cut and engrave a variety of materials on a generous 410 x 400 mm work area. The X4 Pro is the higher-end version of the X4 and includes an acrylic enclosure with an exhaust port on the back for venting smoke during use. This enclosure sets the X4 Pro apart from most desktop laser engravers in this price range, but the acrylic panels are fragile and not likely to last in a high-volume workspace.
The X4 Pro offers an impressive set of safety features, including a flame sensor, several endstops, a security lock that requires a key to engage, and a large red E-Stop on the front of the unit. The integrated webcam is perfect for visualizing the work area and laying out multiple parts on a project, and the acrylic enclosure worked well at containing the majority of smoke and particulates created during use.
Before buying, users should know they will likely be required to do some command line prompting as well as generating material profiles for the third-party Lightburn software. While the X4 Pro has solid and reliable hardware, it unfortunately comes up short during the out-of-the-box software experience. The Mecpow X4 Pro didn’t make our list of the best laser cutters and engravers, but it’s still a machine that offers compelling value for the $799 list price.
Specifications of Mecpow X4 Pro
| Machine Footprint | 26.97 x 24.41 x 12.20 inches (685 x 620 x 310mm) |
| Engraving Size | 16.14 x 15.75 inches (410 x 400mm) |
| Laser Type | Class 1 |
| Laser Power | 22W |
| Laser Spot Size | 0.08mm * 0.10mm |
| Safety Features | Flame Sensor, Tilt Sensor, E-Stop, Security Lock |
| Enclosure | Integrated |
| Air Assist | Included |
| Cutting Platform | Optional |
| Connectivity | USB, Wi-Fi, microSD |
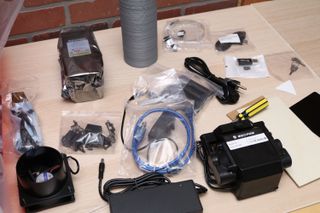
Mecpow X4 Pro: Included in the box

The Mecpow X4 Pro ships with everything needed to get started, as well as an external air assist module and a flexible exhaust hose. Three material samples are included, as well as various tools and cable for connecting the engraver to a computer and an antenna for the WiFi module.

Mecpow also sent the H44 honeycomb working table, an accessory which is used to reduce the amount of charring or burning on the backside of the workpiece once the laser has fully cut though. This is an optional accessory, and it sits on top of the removable slide tray on the bottom of the unit. The honeycomb table has no alignment features or locks, so it can slide freely during use unless secured down.
Design of the Mecpow X4 Pro
Image 1 of 2

Visually, the Mecpow X4 sits somewhere between open-frame laser engravers like Wizmaker L1 and fully enclosed units like xTool P2. Mecpow offers a lower-cost non-pro version of the X4 that doesn’t include the acrylic cover, which looks more like a DIY solution than a piece of industrial equipment.
Assembly of the X4 Pro takes about half an hour, most of which is spent on the acrylic cover. Interestingly enough, the X4 Pro has a few buttons on the front of the machine which allow the user to frame, start, stop, and pause a job, but there is no LCD screen or other user interface available.
Image 1 of 2
The X4 Pro laser toolhead is easily removable for calibration, cleaning, and maintenance. The air assist blows air directly over the engraving area, and the front of the toolhead has a small acrylic laser shield to reduce exposure to laser radiation. Installing the toolhead only requires two connections: the rubber air assist hose and the power cable for the laser module.
Image 1 of 2
The acrylic lid is brittle and scratchy, and two of the four panels were cracked during shipping. This is one of the weak spots of the Mecpow X4 Pro, as the lid is one of the major selling points over the $200 cheaper X4. Laser engravers like the xTool M1 typically have a solid enclosure with a single window on the top of the unit, which is more durable and less likely to break during operation. In addition to the cracks, the joints on the acrylic panels used for assembly have a little play, which means smoke and laser radiation could potentially escape.
Image 1 of 2
The Mecpow X4 Pro has a small bar on the side of the laser module which is used to calibrate the offset between the laser and the material. This focus adjustment bar is held in place with magnets which securely fasten the bar against the toolhead. Once the focus adjustment is set and the offset is correct, the two screws on the toolhead can be tightened to hold the toolhead in place.

The X4 Pro includes an air assist module which blows air over the cut area to reduce smoke buildup and create cleaner cuts. This air assist module draws power from the X4 Pro, which means during high power usage (such as the starting point of a cut), the air assist module will slow down and an audible decrease in air flow can be heard. While this isn’t a critical issue, ideally the air assist would be at the highest flow at the start of a move, something that could be solved by providing the air assist with a dedicated power supply like the air assist on the xTool M1.

When connected to a computer via USB, the Mecpow X4 has wired connections for power, USB for the webcam, power for the air assist, and a hose from the back of the unit for air filtration. This creates a distractingly messy experience with multiple cables, a WiFi antenna, and an air assist control knob all taking up space in front of the unit.
Safety Features of the Mecpow X4 Pro

The enclosure of the Mecpow X4 Pro has a mounting point for the internal fan which blows smoke out from the rear of the unit. The internal fan mount also has an external flange which can be hooked up to a fume extractor to remove and filter the particulate from the smoke. For users concerned with air quality and filtration, this is a high-priority feature which could be a major selling point.

The X4 Pro has an integrated tilt sensor that automatically cuts power to the laser if the unit is tilted, preventing it from continuing to run if it falls off a table or is bumped. The lid also has a sensor installed which will automatically stop the print if the lid is opened during engraving. Finally, an integrated flame sensor will also cut power to the machine during printing if a flame is detected, although you should generally never leave a laser running unattended to prevent accidents. These are all safety features which should come standard on most engravers, and their inclusion on the X4 Pro will likely appeal to users who take laser safety seriously.

The X4 Pro has an E-Stop (emergency stop) button located on the front of the unit, something typically only seen on industrial equipment. This button will immediately stop the machine from running, and is intended to be used in case of an emergency like the workpiece igniting or a process running out of control. The security lock next to the button disables the engraver when engaged, another feature typically seen on industrial machinery where lockout tagout equipment is used to prevent unauthorized use.
Software for the Mecpow X4 Pro

Mecpow does not offer any software for the X4 Pro, and instead directs users to the free and open-source LaserGRBL (Windows only), paid professional app Lightburn (Windows and macOS), and mobile app MKSLaser (Android and iOS). In order to connect the X4 Pro to my MacBook Pro, I had to first install the included drivers which involved terminal commands, security overrides, and generally felt like a hacky experience.
Image 1 of 2
Lightburn can take the input from the integrated USB webcam and project the current view into the digital workspace. This involves first calibrating the camera with a printed sheet covered in dots placed in various locations around the platform. The paper included with the X4 Pro was glossy as well as crumpled, so the glare from the webcam and distortions make it impossible to calibrate correctly. After reprinting the image from the Lightburn site, I was able to align the camera to the workspace correctly.

The X4 Pro is advertised as being compatible with MKSLaser, a mobile app that can connect to the laser via WiFi and start, pause, and generate jobs. The app currently has an abysmal 1.9/5 rating on the iOS store, and the reviews are filled with frustrated users who are unable to connect to their laser. Successfully connecting to the laser requires users to switch their WiFi network to the one generated by the X4 Pro, which is a manual process that involves finding the IP address of the laser and manually entering it into the app.
Image 1 of 3
The ‘grave’ mode allows users to draw on a canvas, select print speed and laser power, and send the job to the laser. This is a fun novelty, but I really struggled to come up with an application where this process would be preferable to using Lightburn. Because the app can also see jobs on the microSD card, having an integrated LCD screen with this display would be ideal for offline use as opposed to having to connect a mobile phone to the laser.
Engraving / Cutting with the Mecpow X4
Image 1 of 2
The Mecpow X4 Pro includes several prepared engraving jobs on the microSD card, including one titled ‘cat-test.gc’. This is a small engraving of a cat that completes in only a few minutes, and verifies the functionality of the machine.
The microSD card includes a folder full of .PNG images for engraving, including a rabbit with a watermark burned over the image and a clipart drawing that has the checkerboard pattern from a transparent background covering the entire image. It was a very underwhelming start, and I suggest skipping these images so you don’t waste time or material.
Image 1 of 3
I cut the Heart Box by Thingiverse user bdahlem from 3mm Walnut plywood. This took 24 minutes and 37 seconds, and the living hinge wrapped around the model completely. I was impressed by the accuracy of the integrated camera, and the cut lines were very close to the workspace overlay. The X4 Pro laser spot size of 0.08×0.1mm allows for very fine cuts and engraving details, and the kerf on the living hinge is precise and allows for a good bit of flexibility.

Unfortunately, the X4 Pro does not include any Lightburn profiles for various materials, something that will be confusing and frustrating to beginners who are not sure what settings to start with. Lightburn allows users to generate a cut test, which creates a matrix of cuts that increment in both power and speed to find the correct setting for each material. The user manual includes a single page with some recommended material settings, but profiles need to be generated for each material and tested by the user.

This is similar to 3D printers: higher-end models like the Bambu Lab X1-Carbon and the Prusa MK4 include slicer profiles for various materials and applications while less expensive machines like the Flashforge Adventurer 5M Pro typically don’t offer similar levels of support to users. Considering the X4 Pro does not include any first-party software and relies on other software, suggested profiles would be greatly beneficial to users while not requiring the same level of development from the Mecpow developers as creating an entire first-party app.

Not just limited to cutting wood, the 22W laser module of the X4 Pro is also capable of engraving on slate coasters. For a test, I used a design by Maks Surguy titled “Genuary Day 29 – Any Shape, none can touch” from Plotterfiles, an excellent resource for interesting and artistic vector-based artwork.

The integrated camera on the X4 Pro comes in very useful when engraving multiple models simultaneously. Framing a job will show you the entire footprint of the job, not the size of the individual parts. This means that laying out multiple parts can be a frustrating experience. By adding four slate coasters to the workspace and selecting ‘Update Overlay’, the parts are all brought into the active workspace and can be directly drawn on, removing the frustration of trying to guess the location of multiple workpieces. I duplicated the design and centered it on each of the four coasters before starting the job.
Image 1 of 2
With a 2000 mm/min speed and 50% laser power, each coaster took 6 minutes and 22 seconds to engrave for a total engraving time of a little over 25 minutes. By running the design over the edge of the coasters, the lines wrapped around the perimeter seem to run straight down the edge, a nice effect that is made easier thanks to the raised honeycomb panel.

Engraving coasters is a compelling application for a 22W laser like the X4 Pro, and the results speak for themselves. Users are able to tightly pack coasters on the 410 x 400mm workspace, lay out engravings with the onboard camera, and process the job as a single batch. For small businesses with a market for these or similar products, this functionality will allow the machine to quickly pay for itself.
Image 1 of 3
The 410 x 400mm build area of the X4 Pro is large enough to print complete assemblies in a single job, something that will be appealing to anyone making puzzles, frames, or other large objects. While cutting a staircase assembly designed for miniature wargaming, one of the small perforations flipped up after cutting and caused the honeycomb panel to be dragged around the workspace. This was a frustrating experience, as the floating honeycomb table is not secured to anything and can slide around easily on the inside of the machine.
Image 1 of 2
After taping down the honeycomb table, the part successfully completed in 29 minutes and 22 seconds using a sheet of 3mm walnut plywood. Assembling the staircase was a quick process, and the joints were a clean friction fit that held together without any glue. The relatively large size of this model is impressive, especially considering it was cut so quickly.
Bottom Line

The Mecpow X4 Pro is not one of the best laser cutters and engravers, and overall I was left wanting a more polished experience right out of the box. While the emphasis on safety is commendable and the safety features are useful, the X4 Pro seems to sit somewhere between open-frame inexpensive laser engravers like the budget-friendly 5W Two Trees TTS-55S and the more professional fully-enclosed 20W WeCreat Vision. The software development has been almost entirely pushed off to Open-Source developers and other companies, creating a bit of a grey area when it comes to accountability for new features.
The 410 x 400mm working area is impressive, and the 22W diode laser was powerful enough to engrave and cut all the test material I could throw at it. The overall aesthetic of the X4 Pro would be right at home in a print shop or a machine shop, and the large footprint means this won’t be a good fit for most home users. However, for power users comfortable with laser engraving who already have a filtration system, the X4 Pro provides serious power for well under $1,000.
Mecpow offers this engraver in two variants: the X4 and the X4 Pro. The $200 difference between the two gives the user multiple quality-of-life upgrades, including the integrated webcam, LED light strips, and an enclosure for containing smoke and particulate. Given the competition in this price range, the $799 Mecpow X4 Pro may struggle to win over consumers, but the enclosure and integrated smoke exhaust are strong features that put it ahead of machines like the similarly priced xTool D1.
#Mecpow #Pro #Review #Watts #Budget