
Pimoroni Clipper 4G LTE Breakout Review: Easy IoT
Wireless communication on the Raspberry Pi Pico W has typically been achieved using either Wi-Fi or Bluetooth. The original Raspberry Pi Pico or the new Raspberry Pi Pico 2 couldn’t get online (without a little help from an ESP32) but it seems that Pimoroni has taken a different approach with getting our Raspberry Pi Pico 2 online, 4G LTE!
The Clipper 4G LTE is essentially a breakout board for a SIMCom A7683E 4G LTE module with an onboard SMA connector for an antenna, and a nano SIM card slot. This isn’t a board for streaming movies, as it can only reach 5 Mbps uplink and 10 Mbps downlink. It is a board for projects that need to send a quick burst of data, think science projects, sensors etc.
Is the Clipper 4G LTE kit worth your $28? Let’s find out!
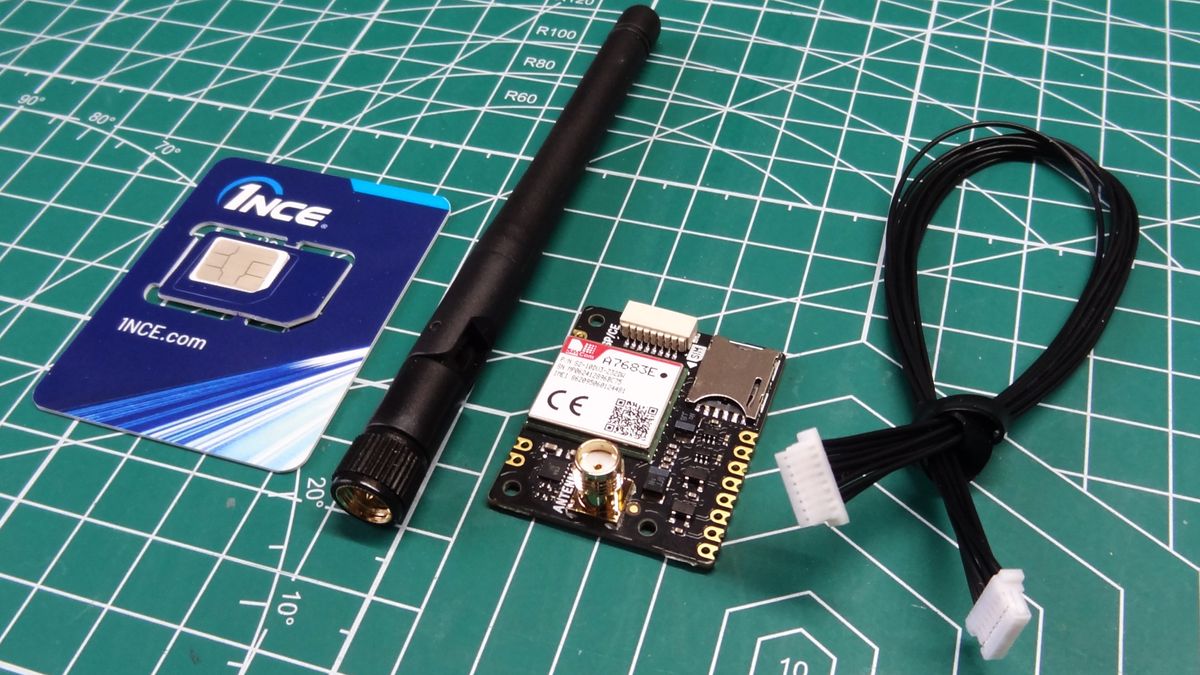
| Module | SIMCom A7683E 4G LTE |
| Frequency Bands | LTE-FDD B1/B3/B5/B7/B8/B20/B28 |
| Control | AT Commands |
| Data Transfer Speed | Uplink 5Mbps, Downlink 10Mbps |
| SIM Card | Nano SIM |
| Antenna | SMA connector |
| Compatibility | Raspberry Pi Pico 2 / RP2350 / RP2040 support coming soon |
| Connection | GPIO or via SP/CE (8-pin JST-SH) |
Image 1 of 3

If you’ve got a SP/CE connector on your board (like our Pimoroni Pico 2 Plus) then you just need to connect the cable between the Pimoroni Pico 2 Plus and the Clipper 4G, insert the nano SIM card and connect the antenna. That’s the hardware installation done. Unless you don’t have a SP/CE connector. For Raspberry Pi Pico 2 and Raspberry Pi (and future RP2040) users, you can use the GPIO to make a connection. You’ll need to connect the 3.3V, GND and TX, RX pins accordingly (remember that TX on the Clipper goes to RX on the Pico, and RX on the Clipper to TX on the Pico).
I chose to connect via SP/CE to a Pimoroni Pico Plus 2, and after downloading the MicroPython script, tweaking the APN to match the 1NCE service, I was in business. The first test? Getting online and receiving an HTTP status code from the Pimoroni website. Code 200 and all was good, meaning that I was ready to proceed to a more useful task.

When the Raspberry Pi Pico W was released, I wrote a simple MicroPython script that would connect the Pico W to the Internet, download the names and details of all of the astronauts on the International Space Station as a JSON object, extract the names, and print them as a list to the Python REPL. I am happy to say that after a little tweaking to the connection, I managed to do this with the Clipper 4G.
Image 1 of 2
That test proved that I can receive data “in the field” but what about something even more useful? MQTT (Message Query Telemetry Transport) is now 25 years old and it can be found powering the most unlikely of things (Facebook Messenger!) and we have already used it with the Raspberry Pi Pico W. After a few tweaks for the Clipper 4G connection, I was able to subscribe to a topic, and from another device I was able to publish a message on that topic. The Pimoroni Pico Plus 2 received the message and printed it to the REPL. I was also able to publish a message from the Pimoroni Pico Plus 2 to a device subscribed to the same topic. Thus proving that two communications was possible, and I have to say, very easy. How useful is MQTT with the Clipper 4G LTE? MQTT was designed for situations like this, perhaps even worse. MQTT was designed at a time when cellular data communications was expensive, and so short bursts of data were preferred to longer streams. For our 1NCE data connection we only have 100MB to test, and so MQTT, with its low data usage, is an ideal means to send and receive data.
Image 1 of 2
I expanded on the MQTT test by adding a BME688 temperature and humidity sensor via the Qw/ST (Stemma QT) connector. After adding the BME688 code to the MQTT publishing code, I was able to publish the temperature of my office to anyone subscribed to the TomsHardware MQTT topic.
Image 1 of 6
Yes you can use the Clipper 4G LTE with devices other than the Raspberry Pi Pico 2 or Pimoroni Pico Plus 2. You’ll need to make a serial connection via the GPIO, and I did just that. Connecting to the GPIO UART of the Raspberry Pi 5 we configured ppp to make a connection and went to fast.com to find out how fast it could go. Our best speed was 63Kbps down and 87 Kbps up.
I did manage to load the Tom’s Hardware homepage, but I was also able to make a cup of tea while it worked. I was also able to make a connection using a USB to serial device on my Ubuntu laptop, again it was a slow process to get a web page. Stick to simple text based web queries unless you really need to send or receive images. It’s possible to send an image, but it will be slow. For those scenarios it would be best to use a USB 4G dongle.
1NCE Data Sim
Included in the kit was a 1NCE data sim with 100MB of data, valid for six months and in 150 countries. Getting online with 1NCE was easy, I just had to use the correct APN (iot.1nce.net) in my MicroPython code and I was online. When the data runs out, we need to visit Pimoroni’s top up page and add more data. And here is where we have a small snag.
There is currently no means to monitor data usage, online or via code. I’ve spoken to the Pimoroni team and I’ve been assured that there will be a means to monitor your data, along with an email alert for when your credit is running out. I asked about a future API to check usage via code, and this may happen one day.
Who is Clipper 4G LTE for?
If you are a maker who needs data connectivity for a project in the field, then Clipper 4G LTE is the simplest way to get your project online. I can see it being used in many citizen science projects, data collections and perhaps being used in robotics along with a controller. If you need 4G on your laptop then Clipper 4G LTE is not much use. Buy a travel router instead. On a Raspberry Pi, it is useful for quick bursts of low bandwidth data, like MQTT. But the Pico is a versatile board for IoT and it also consumes far less power.
Bottom Line
For sheer ease of use, Clipper 4G LTE is a powerful tool. I was able to get online within minutes, and in a few hours of tweaking and learning I was able to build a useful IoT device for data collection. The price is good, $28 for the kit is a good deal. If you want total simplicity, factor in the $14 for a Pimoroni Pico Plus 2 (for the SP/CE connector) and you have a solid IoT package with 4G access.
#Pimoroni #Clipper #LTE #Breakout #Review #Easy #IoT