I’m typing this on the world’s largest keyboard, a 178-key best designed to make you more productive
In the past few years, the trend in keyboards has been toward smaller layouts with fewer and fewer keys. The vaunted numpad, which you can remap to become anything you want, is now gone from many models and there are many keyboards without arrow or function keys. But what about those of us who, like me, think that the best mechanical keyboards should be going in the opposite direction, adding more keys for macros and quick program launches?
Today, I’m typing this article on a prototype build of the MechBoards Hyper7 R4, a 17.6-pound (8 kg)keyboard with 178 keys, the most of any keyboard on the market, perhaps the most ever made. The keyboard is being made and sold as part of a 500-unit production run by UK-based MechBoards. Most of the units in this run (the fourth incarnation) are already spoken for and headed to pre-orderers. But, as of this writing, some are still available at the company’s site. Because I tested a prototype and because this is a limited-production item at the end of its run, we’ve chosen not to give this product a star rating.
The Hyper7 R4 is a beautiful and highly unique keyboard that makes you feel like the ultimate power user as soon as you put your hands on it. The keys are laid out in six different blocks, with a bottom set of three blocks that includes the alphanumeric keys and an upper of three blocks of programmable keys that are elevated and titled up at a roughly 45-degree angle. Placing this keyboard in front of my four-monitor desktop setup made me feel like I was ready to take over the world with the right combination of button presses.
Configurations of the Hyper7 R4
You can buy the Hyper7 R4 in a variety of configurations. There’s either an enclosed version – what I tested – or one where the PCB and plate above it are screwed together by standoffs in a more open-air look. If you get the enclosure – which I recommend – you get a choice of Black, Grey, Cream or Stainless Steel colorways. There’s a Classic layout which has a tiny space bar and five extra keys where the spacebar might be or the Modern layout, with a regular-size spacebar (which is what I tested).
You also have to pay separately for the keycaps, stabilizers, and switches and you can choose whether or not to have your keyboard assembled or put it together yourself. I recommend having it assembled to avoid issues. Depending on whether you bring your own switches and stabilizers and build it yourself or not, you’re looking at a total price of between $350 and $650 or so. That’s a premium price for sure, but there’s nothing even close to the size of this keyboard on the market.
Size and legends on the Hyper7 R4
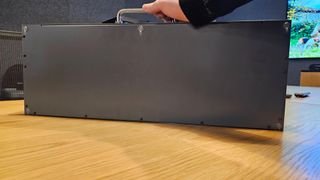
The keyboard is sized at 23.4 x 8.7 x 2.6 inches (59.5 x 22 x 6.5 cm). By comparison, the Cooler Master MK770 (my usual daily driver) is just 15 x 5.5 x 1.5 inches (39 x 14 x 4 cm). The Hyper7 R4 weighs 17.6 pounds (8 kg) with the enclosure or 11 pounds (5 kg) without, compared to just 2.3 pounds (1 kg) for the MK770. Unlike many other keyboards on the market that have Wi-Fi or Bluetooth, the Hyper7 R4 is strictly a wired affair with a single USB-C port on its back, along with a giant metal handle which you absolutely will need if you want to carry this heavy, metal object even short distances.
Below, you can see the Hyper7 next to a 60-percent keyboard, the Royal Kludge R65. The smaller keyboard, which is 1.41 pounds and 12.6 x 4.6 x 1.6 inches, looks like two or three of them could fit inside the Hyper7.
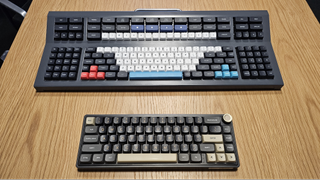
For better or worse, the Hyper7 R4’s unique layout (even with the Modern layout we tested) takes a lot of getting used to, and it helps to have big hands. Styled after the 1970s Space Cadet keyboard, which was used on Lisp machines, but with a lot more keys, the Hyper7 not only has a lot of letters, numbers and functions, but it also has some very odd legends on its default keycaps.
There are keys including those for “Symbol,” “Hold Input,” “Suspend,” and “Fun.” These might have made sense on the Lisp machines, some proprietary workstations used at MIT in 1978, but they don’t hold any meaning for most people in 2025. There are no keys by default for Ctrl, or the Windows key.
Fortunately, it’s easy enough to remap any key using VIA, a free web-based utility that allows you to assign any key to any other key or even to a macro. VIA is a very popular utility and MechBoards provided a JSON configuration file that allows you to use it with its unique, 178-key layout rather than a standard 104-key or tenkeyless form factor. In the web UI, I needed to only click on a key on the key map and then choose another key to assign it to and this mapping is stored on the keyboard itself.
Issues with the unique layout
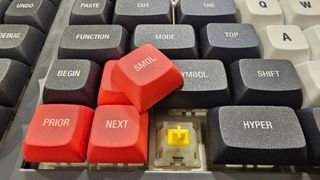
Unfortunately – and this has been a real downer for me in my testing – the size and shape and layout of keys doesn’t match what most people are used to. So, even if they are mapped to the function you need, they don’t feel the same to the touch. For example, on most keyboards, the Ctrl key is on the bottom left, two or three keys away from the spacebar and it’s an extra wide key, along with the Windows and Alt keys. On the Hyper7, there are five keys to the left of the spacebar: Alt, Hyper, SMOL, Next and Prior. So I mapped the Hyper key to be a Windows key and the SMOL key to be CTRL, but SMOL is a tiny, narrow key with two more keys to its left, which made it harder for me to hit with my muscle memory.
The worst situation for me was with the Backspace key, something I hit a lot in the course of my typing experience as I make typos. On a typical keyboard, there’s a very wide Backspace key to the right of the +/= key in the upper right corner of the alphanumeric block. On the Hyper7, there’s a key labeled BSP just to the right of the }/] key which defaults to backspace and then there’s another key labeled “Undo” that’s four keys to the right of the +/= key. In between the +/= and Undo are a \ key, a { key and a } key, all of which exist elsewhere on the keyboard, so they aren’t absolutely necessary.
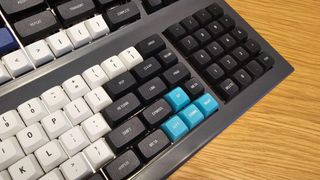
Putting my fingers on the home row, with my index fingers on the J and F, I had a very hard time reaching either the BSP or Undo with my right pinky. I eventually remapped five keys in total to serve as Backspace (\,{,}, BSP and Undo) so I could avoid hitting the wrong one, but still none was conveniently located where my muscle memory expected and I got some muscle aches over time that made me really frustrated.
The Hyper7, unlike any keyboard I’ve seen, is perfectly symmetrical, with the spacebar perfectly in the middle of the body, with an equal number of keys to its left and right. On most keyboards, the spacebar is a little offset to the left, with more keys to its right. However, here there are five keys on either side of it and each row above it has an equal number of keys to the left and right of the alphanumerics. For example, on the ASD row of a typical keyboard, there’s a Caps Lock key to the left and an Enter key to the right. But here there are three keys on either side of this row: Top, Mode and Function on the left and Return (Enter), Line and Page to the right. This wasn’t a major hassle, but the keys outside of the alphanumeric block were hard to hit by touch typing.
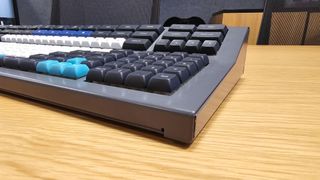
In addition to the alphanumeric block with the spacebar, letters, numbers, and common punctuation, there are five other blocks of keys. To the left of the alphanumeric block is a 20-key block of function keys and a series of other keys labeled “Find,” “Write,” “Debug,” etc. Normally, you’d expect the Function keys (F1 – F12) to be above the number row, but here they are on the side, which was not too much of a hassle because I don’t hit them so often that I expect to do so with my hands on the home row. I mapped the Find, Write, keys, etc to function keys above F12 (Windows supports F13 – F24). To the right of the alphanumeric block is a numpad block with all the numbers, arithmetic operators, a delete key and a “Fun” key.
In the upper right and upper left corners of the keyboard are two 8-key blocks. The left block has keys labeled Help, Macro, Local, Network, Close, Open and the F1 and F2 keys. The right block has Call, Reset, Suspend, Caps Lock and some symbol keys. The middle top section has 38 keys, some of which are wide – Terminal, Quote, Over-Strike – and some of which are narrow and have symbols on them. Some of the symbols could be useful for those who work across regions. For example, the legends show a Euro symbol, a Pound sign, and a Yen sign. By default, it doesn’t actually produce these symbols (I got ASCII codes instead) but they could be mapped to do so using VIA.
Mapping keys with VIA
VIA is a free, web-based app that allows you to remap the keys on any compatible keyboard and store the results on the keyboard, not in the OS. By default, VIA doesn’t have a 178-key map to match the layout of the Hyper7 R4, but MechBoards provided me with a JSON config file which I uploaded to VIA and was then able to see a complete map of the keys.
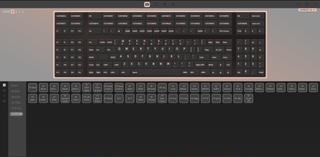
When I clicked each key in VIA, I was able to either remap it to be another kind of key (a symbol, modifier, etc) or even map it into a macro. VIA has a tab that allows you to create macros within it, assigning text or keyboard combos to a key. I, for example, set one key to be the Linux command sudo apt-get update -y, which is what you need to type in Ubuntu, Raspberry Pi OS, or many other Linuxes to get an update. I could also have included a series of other keystrokes, such as hitting the tab key to navigate between fields.
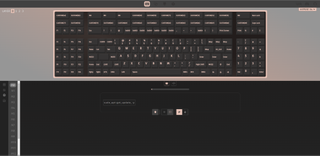
If you want to assign a key to launch an application or website, there are better ways than VIA to do this. You can use a scripting language – I prefer AutoHotKey – to assign a key or key combination to run an application, open a document, or run a program. With AutoHotKey, you can even assign custom macros based on the program that’s currently focused in Windows. For example, on my home PC, I have an AutoHotKey macro that selects Image->Crop from the menus in Photoshop Elements; the macro doesn’t fire or that key combo could do something else if I try it in another app. That’s not quite possible in VIA.
So what would I do with all of the extra keys on the Hyper7 R4? I’d have dedicated keys to launch particular web tools I use daily: the direct URLs of my morning Google Meet meeting, my Gmail inbox and the Tom’s Hardware editorial calendar. I’d assign other keys to launch my favorite offline apps such as Notepad++, Photoshop Elements, and the Slack client.
Finally, I’d assign frequently used pieces of text to yet more keys. These would be for Linux commands or pieces of PHP or JavaScript code that I use a lot. I have to type sudo a lot in front of commands whether I’m SSH connected to one of the best web hosting services or using a Linux VM in Windows. If I want to unzip a file in Linux, I have to type tar xzvf before a filename and I never remember all of the modifiers I need there. So assigning those commands to keys would help me type less and remember less.
Hot swapping and tearing the Hyper7 R4 Down
The Hyper7 R4 is hot-swappable, which means that no matter what switches you buy it with (or you could buy it with none), you can remove them and replace them with others of your choice. However, there are some issues with hot-swapping that make me recommend that, if you buy it, you buy it with the switches of your choice preinstalled.
Our review unit, which is a close-to-final prototype, first came with Gateron Milky Yellow linear switches preinstalled. Since I’m a big fan of clicky switches, I immediately started swapping them out for my favorite switch, the clicky Kailh Box White V2. However, after spending a long time replacing every switch and putting the keycaps back on, I noticed that a high percentage of the keys did not work.
Apparently, the PCB on the Hyper7 R4 can warp and sink too far below the plate after you pull switches out. This is because the switches are the only fastener holding the PCB to the plate above it and, if too many are taken out at once, the board starts to sink. It can’t fall down to the bottom of the case, because there are foam pads below it, but it can sink or bend such that not all of the switches can make contact with their sockets on the board, causing those keys not to register.
In an attempt to fix the problem, and with the blessing of MechBoards, I opened the case to fix the sinking board problem. Inside, there are two foam pads that help dampen noise. There’s a connector that goes from the PCB to the USB port and there’s the PCB itself, which is really two PCBs, one for the top blocks and one for the bottom, connected by a ribbon cable.
With the case open, I held the PCB up to the plate with one hand while pushed in switches with the other hand and I think I did a decent job of preventing the board from sagging. However, after I had put all the switches in again, I tested the keyboard and many of the keys still didn’t register. Fortunately, MechBoards were eager to help and I shipped the review unit back to them, waited a few days and they sent it back to me with the Kailh Box White V2 switches on board. They said that a couple of the switch sockets were broken and that they had fixed them. After receiving the unit back, I tested again and all of the keys registered.
My takeaway from this experience is that hot-swapping the key switches seems risky. It’s unclear to me whether the sockets broke as a result of my taking it apart or maybe they had broken before I got the keyboard the first time. However, the fact that the PCB can sink if it doesn’t have enough switches holding it up is enough for me to advise you to buy the Hyper7 R4 pre-assembled and make sure you get it with the choice of switches you want to stick with.
Our prototype unit, after we got it back, had one small issue that was noticeable but not a deal killer. Some of the keycaps sat higher than others, leaving the letter J, for example, a little lower than the H key next to it. MechBoards said that this is not supposed to happen, but the height difference, though slight, was visible.
Overall Typing Experience
Your mileage as a typist will vary, depending on the size of your hands, the switches you choose, and how easily you get used to the Hyper7 R4’s unique keyboard layout. I found that, with the excellent Kailh Box White V2 switches, I was able to reach my usual typing speed of 101 wpm with about a 4.5 percent error rate.
My real problem is not speed per se but some soreness in my right pinky and some frustration because reaching for the backspace key, even with it mapped to a cluster of five different keys, was such a hassle. Similarly, reaching for the right CTRL key, which I had mapped to the SMOL key, often led to errors for me. Even after using the keyboard with my desktop for a couple of weeks, I was still struggling, particularly with the Backspace key placement.
If MechBoards builds an R5 version of the Hyper7, I’d like to see a layout that’s more typical of other keyboards, with the spacebar slightly offset to the left, a size-accurate set of Ctrl, Windows, and Alt keys and a Backspace key that’s to the right of the +/= key. The amount of keys is amazing, but the alphanumeric block would be much easier to navigate if it were more like other U.S. and UK keyboard layouts.
On the bright side, the size of the keyboard was no hindrance at all, provided I used it on a desk that was deep enough to hold it. At my office, the desk space is limited so the Hyper7 R4 barely fit in my workspace and didn’t leave much room for my mouse. At home, however, I have a huge work table and had no problem sticking the keyboard in front of my four monitors. In fact, I was even able to put my favorite wrist rest – the HyperX Wrist Rest (full size) – in front of the keyboard. The wrist rest wasn’t long enough to match the entire Hyper7, but it fit nicely under the alphanumeric block, which is where I rest my wrists.
Bottom Line
The MechBoards Hyper7 R4 is a truly unique product that shows what’s possible if we focus our input devices on productivity, instead of compactness. This is a product that’s expensive, but one that promises a unique experience you won’t find anywhere else.
However, if you have small hands or worry about retraining your muscle memory, you may find the layout of the alphanumeric keys challenging, as I did. If you can afford the keyboard and can get used to it, there’s a huge reward waiting for you in all those extra, reprogrammable keys.
#typing #worlds #largest #keyboard #178key #designed #productive

