
How to Run DeepSeek R1 on your Raspberry Pi 5
You can’t have missed the seismic event that saw Nvidia lose $589 billion in market cap as confidence in AI took a hit after DeepSeek claimed that its open source R1 model could provide rival OpenAI’s o1 model performance, with 11x less compute to train its latest models. The fallout from this is still being debated, but it has certainly put the cat amongst the pigeons.

Before we delve too deeply into this how to, let’s manage expectations. Yes you can run DeepSeek on your Raspberry Pi but it is CPU bound so don’t expect your queries to complete in a few seconds. No official AI accelerator HAT or addon will currently accelerate the model. The only means is to connect up a GPU to the Raspberry Pi 5’s PCIe connector, likely using one of Pineboard’s Hat UPCIty Lite boards and an external power supply.
This means that the Raspberry Pi 5 is at a disadvantage to my desktop PC which has an Nvidia RTX 4070 GPU. When ollama runs, it checks for a GPU and if found, it will use it. So my RTX 4070 is doing all of the work.
The Test
Running the R1:8b locally, I wanted a simple test, and the first thing that came to my mind was writing some Python code. The prompt being:
“write a python script to ask the user their name, save it to a variable called username, and then greet the user by their name 100 times.”

How would I normally tackle this? Three lines of Python code, one to capture the user input to a variable, then two lines to create a for loop that prints the personalized greeting. It’s basic beginner Python that I taught to hundreds of students, so how would an AI tackle it?
username = input("What is your name?: ")
for i in range(100):
    print("Hello",username)

| Test Machine | Specifications | Time Taken |
|---|---|---|
| Raspberry Pi 5 | 8GB LPDDR4X RAM, Broadcom BCM2712 2.4GHz quad-core 64-bit Arm Cortex-A76 CPU | 8:01.08 minutes |
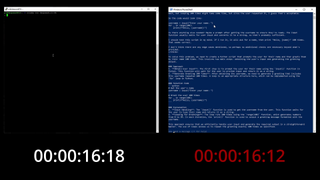
| AMD Ryzen 5 5600X | 32GB DDR4 RAM AMD Ryzen 5 5600X hexa-core 3.7 / 4.6 GHz CPU Nvidia RTX 4070 GPU | 16.12 seconds |
The Raspberry Pi 5’s code was as follows
username = input().strip
for _ in range(100):
    print(f”Hello, {username}”)
Capturing the user input and then sanitizing it before assigning it to the function is a smart move. The strip will remove any white space from the captured string. Printing the greeting using f-strings is a more recent means to format the output. That’s a bit redundant in this scenario, but I would be pleased to see a student try this approach. My gripe with this code is that there is no prompt for the user to type, hence in the video there is a short delay. Thankfully the PC did not replicate this issue.
On the PC, DeepSeek produced this code.
username = input(“Enter your name: “)
for _ in range(100):
    print(f”Hello, {username}!”)
The user input is captured and saved to the variable, and we have an input prompt for the user to respond to. The rest is the same as on the Raspberry Pi 5, with just an extra “!” to emphasize the greeting.

You can’t miss the time difference between the PC and the Pi 5. All of this was offline, relying on the model and the CPU / GPU of the device it is being run on. The PC did everything in 16 seconds, but the Pi 5 hit 8 minutes! Heck the PC was done while the Pi 5 was still loading the model. But, running an LLM on a Raspberry Pi 5 is an interesting experiment, and worth spending a little time on, so lets install one onto a Raspberry Pi 5 8GB. Note, that the Raspberry Pi 5 8GB is really the lowest spec Pi 5 that we would attempt this on. You could try a 4GB Pi 5 with a tweaked model, but your mileage will vary!
Setting up DeepSeek on the Raspberry Pi 5 via ollama
To make things easier, we’ll be setting up DeepSeek via ollama, a free and open source tool that enables anyone to run large language models (LLMs) on their own machines.
The model that we will be using is a distilled Llama model which fits into the 8GB of RAM afforded by our Raspberry Pi 5.
The ollama team states that “DeepSeek team has demonstrated that the reasoning patterns of larger models can be distilled into smaller models, resulting in better performance compared to the reasoning patterns discovered through RL on small models.” Why are we using this model and not a “true” DeepSeek model? Simply because the deepseek-r1:671b model is 404GB in size, and it would clearly overwhelm the Raspberry Pi 5.
Installation on the Raspberry Pi is a breeze thanks to ollama’s script.
1. Open a terminal and ensure that your Raspberry Pi 5 is running the latest software.
sudo apt update
sudo apt upgrade -y
2. Download and install the ollama install script. Normally, installing software using a script from the Internet is a major no no. We would never do this in a production environment. If you are curious, the install.sh can be saved to a file and the contents read before use.
curl -fsSL | sh3. Check the version number. Ours was 0.5.7 but yours may differ given the fast pace of LLM development. It is always handy to know what version number you have installed, should you need to log any issues or search for specific guidelines.
ollama --version4. Download and run DeepSeek-r1:8b. This is a distilled Llama model which fits into the 8GB of RAM afforded by our Raspberry Pi 5.
ollama run deepseek-r1:8b5. Wait for the download and install to finish. This can take some time at first, but subsequent loads should be much faster.
6. The user interface is simple, just type in a request / query and the LLM will interpret and respond. Slowly.
7. When you are done, you can either press CTRL + D or type /bye and press Enter to close the session.
DeepSeek on the Raspberry Pi 5 is purely CPU bound. It cannot be used with any of the AI accelerator boards. If you have the knowledge and the equipment, it can be used with an GPU via the PCIe connector on the Raspberry Pi 5. We were unable to test this due to a lack of equipment, but the ever fearless Jeff Geerling is sure to test this in the near future.
#Run #DeepSeek #Raspberry