
The 5 worst Windows 11 distractions and how to stop them
Using Windows 11 these days is like living with Vince the ShamWow guy as your roommate, and he won’t shut up until you buy his wares. Microsoft makes the world’s most popular desktop operating system, but apparently just being there on your computer isn’t enough for the Redmond software giant. It has to leverage that position to show you ads, push its subscription services, and do nearly everything in its power to distract you from your work.
Thanks a lot Microsoft; I really needed to get an alert to “finish setting up my computer” that I set up months ago, just so you can try to sell me an XBox Game Pass or Office 365. It’s not like I had anything better to do than fend off your constant hawking. And it’s not like people are being asked to pay $139 or more for a Windows license and then being forced to see these ads (see how to get Windows 11 for free or cheap).
Unfortunately, while you can’t get Windows 11 to completely shut up, you can disable some of its most distracting sales pitches.
Disable Windows 11 Lock Screen Ads
1. Disable Windows 11 Lock Screen Ads
You may not have noticed (or gotten them yet), but Windows 11’s lock screen now carries small text ads that appear in the center of the screen and the upper left corner.
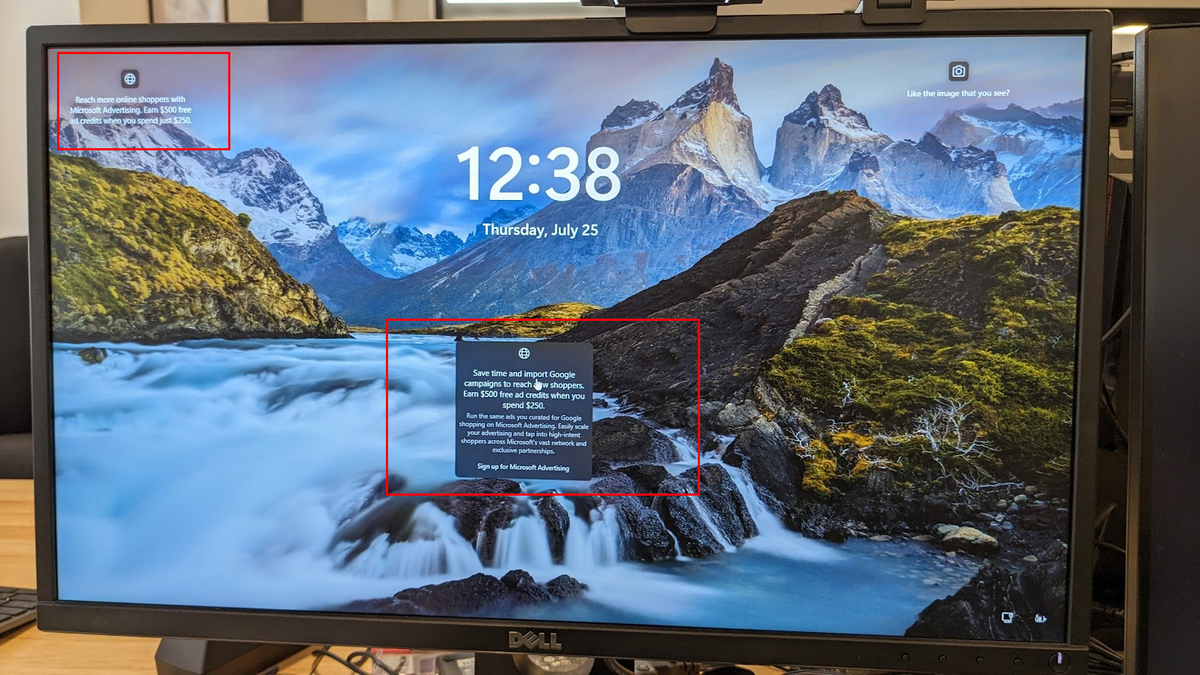
Right now, my ads are for running advertisements on Microsoft.com; I guess it thinks I’m a marketer. However, at other times and on other systems I’ve tested – including some new Copilot+ PCs – I’ve gotten promotions for playing Candy Crush Saga, a preloaded game.

There are a couple of ways to disable ads on the lock screen. First, the simplest is just to change some settings in the Personalization menu.
1. Navigate to Settings->Personalization->Lock Screen

2. Change Personalize your lock screen to something other than “Windows spotlight,” because Windows spotlight definitely has ads. I recommend “Picture” over “Slideshow.”
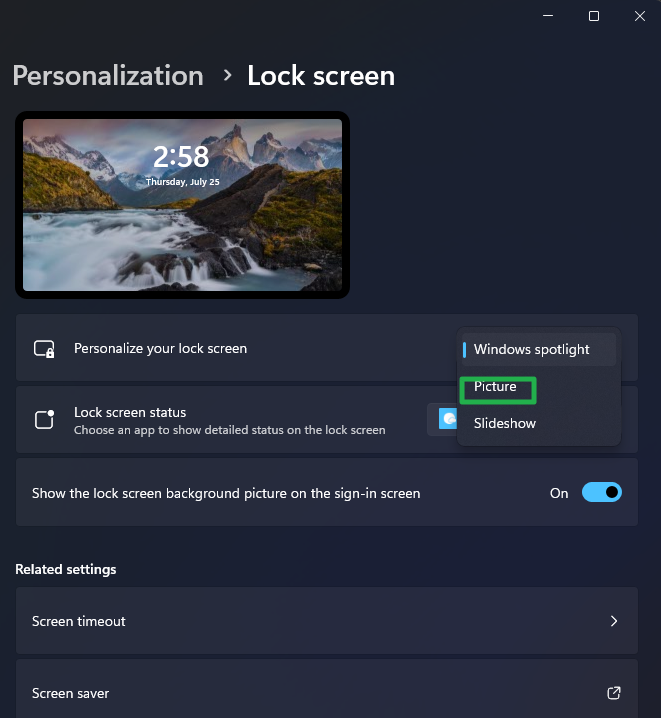
3. Uncheck “Get fun facts, tips, tricks and more…”

That should give you a static image as your lock screen background and avoid ads appearing on it. But why do you even need a lock screen at all? You can disable the lock screen and then, when your computer is locked, you’ll see the login screen that asks for your password (or PIN or face or thumbprint). The lock screen itself is unnecessary and just adds an extra click you have to make before getting to your password prompt.
To get disable the lock screen altogether:
1. Open Regedit. You can get there by searching for “Regedit.”
2. Go to HKEY_LOCAL_Machine\SOFTWARE\Policies\Microsoft\Windows
3. Create a new key called Personalization if you don’t already have one.
4. Within Personalization, create a DWORD (32-bit) value called NoLockScreen and set that to 1.

Get rid of the Let’s finish setting up your PC splash screen
2. Get rid of the Let’s finish setting up your PC splash screen
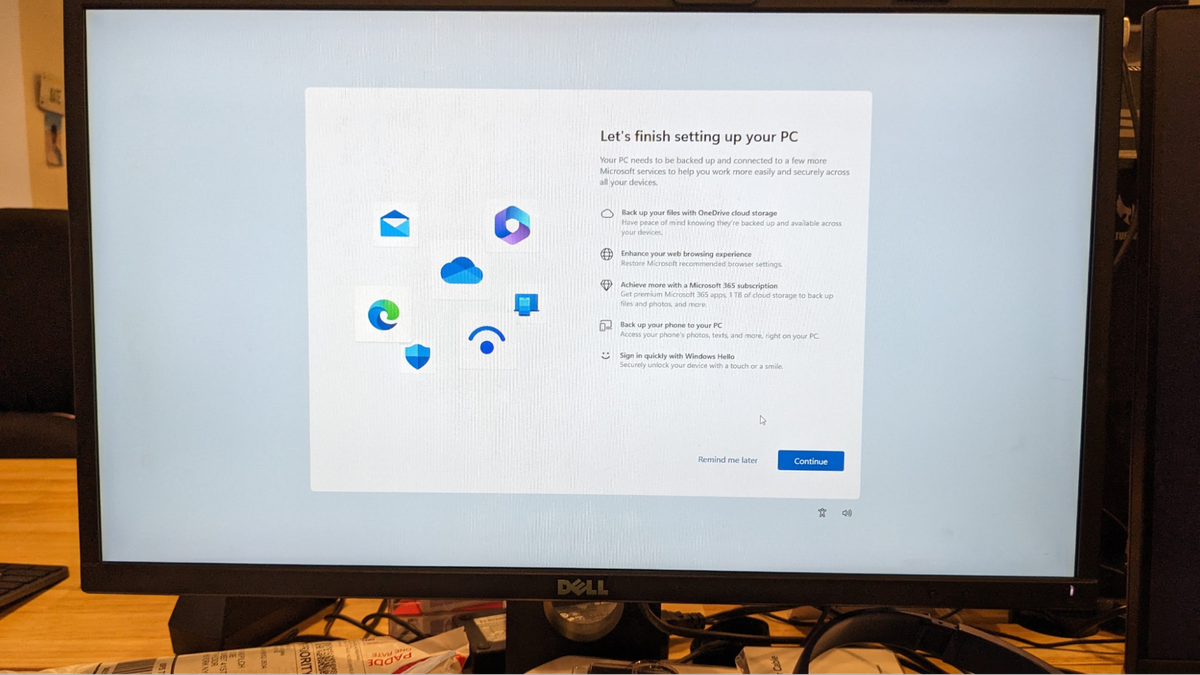
Perhaps the most annoying thing Windows 11 has been doing lately is popping up dialog boxes saying “Let’s finish setting up your PC” so it can try to get me to sign up for more Microsoft services like Office 365 or Xbox Game Pass. Microsoft calls this the Second Chance Out of the Box Experience (SCOOBE). I call it “not taking no for an answer.”
SCOOBE pops up at the most annoying times, like when I boot up my PC in the morning and just want to get to work. I can ask it to “remind me later” but, like something out of a 1980s horror franchise, it will come back again sometime soon.
To stop SCOOBE for good:
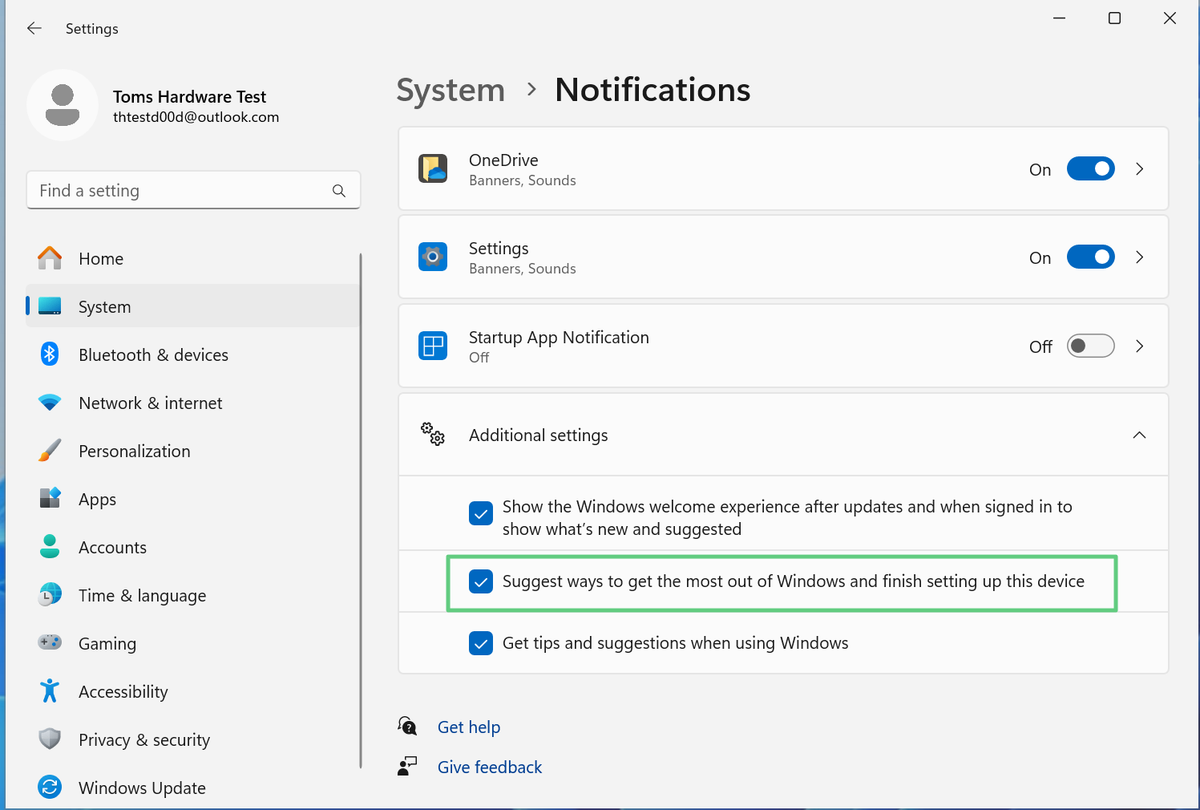
1. Navigate to Settings->System->Notifications
2. Click Additional Settings
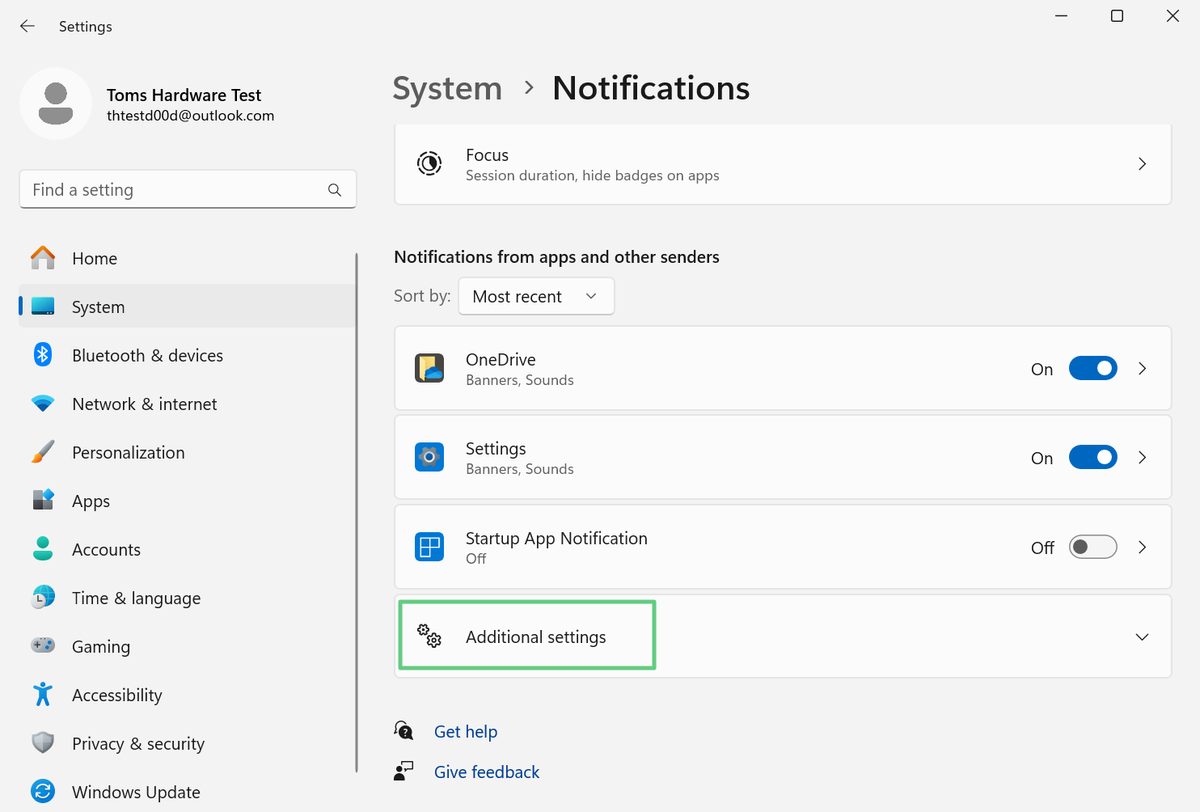
3. Uncheck “Suggest ways to get the most out of Windows and finish setting up this device.”
Hide the Taskbar Widgets

At first, it seems like a huge convenience. There’s a little weather widget sitting on the left side of your taskbar telling you what the temperature is and whether it’s raining or not. Who wouldn’t want to know what it’s like outside?
But the widget often changes to show distracting information you didn’t ask for: stock prices, information about traffic jams (why would it matter if I’m sitting at my desk), and the very distracting term “breaking news.”
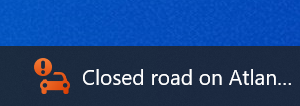
And if you are tempted to hover your mouse pointer over it because you just saw “breaking news” and figure that a nuclear war broke out and you need to be informed, you will be treated to “the widget board,” a giant set of headlines that may involve emotionally-fraught topics such as politics, war, crime, or weird stuff like people claiming they’ve had near-death experiences. Whatever the case, the widget is a distraction. If you want news, you can always open your browser and point it to your favorite news site rather than letting Windows try to suck you into its news feed. All of the stories on the widget board are from MSN.com, so this is a pure play for page views and ad revenue on Microsoft’s part.
To hide widgets from your Taskbar:
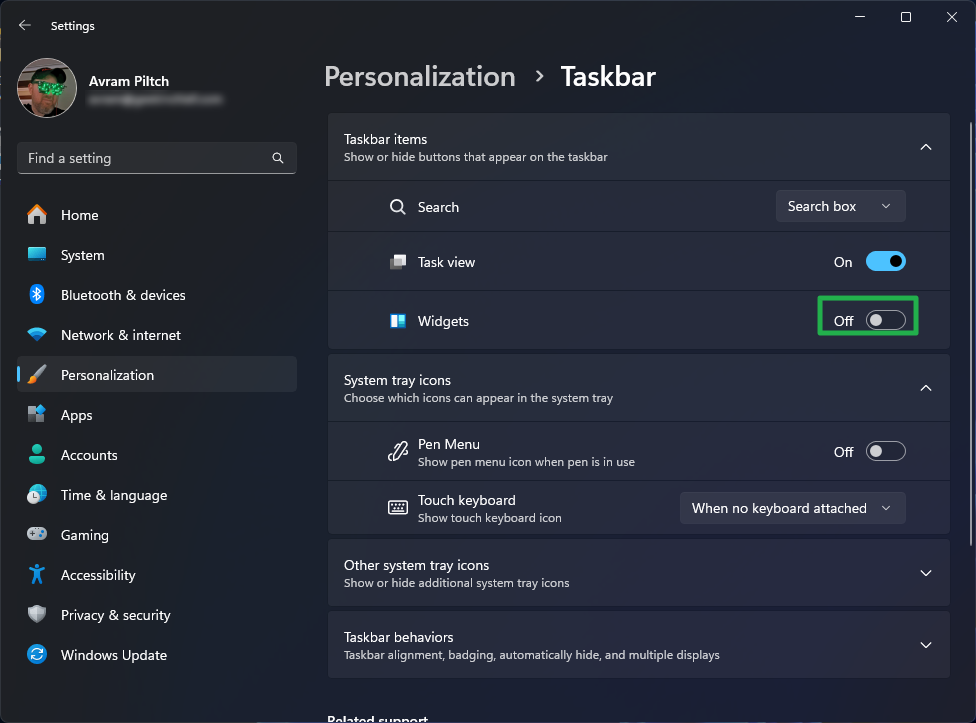
1. Right-click on the taskbar and select Taskbar Settings or Navigate to Settings->Personalization->Taskbar.

2. Toggle Widgets to off.
Hide Search Highlights
4. Hide Search Highlights
One of my favorite features in Windows 11 and 10 is the search box that lives in the middle of the taskbar. I click there and use it to find my favorite programs and files with just a few keystrokes. But, by default, Windows 11 tries to distract me with “search highlights,” its set of promoted headlines, historical facts, and promotions for apps and games.
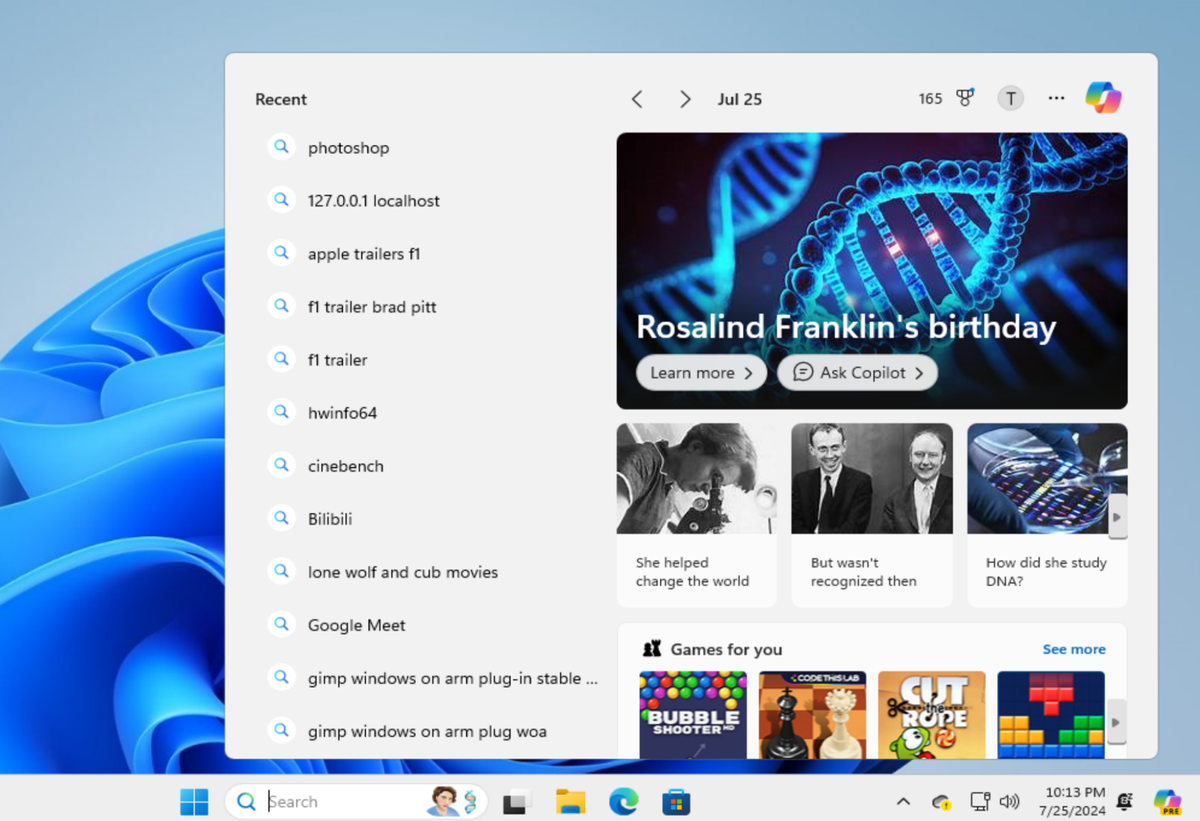
For example, as I was writing this, my Windows 11 showed a small icon in the search bar that was a picture of Rosalind Franklin, a famous scientist who helped make many advances in our understanding of DNA, coal, and viruses. When I clicked on the search box to begin looking for an app, I was treated to a giant set of tiles with links to stories on MSN about Rosalind Franklin’s birthday and her discoveries, followed by promotions for completely irrelevant apps such as Bubble Shooter and Cut the Rope.
Even if you care deeply about the birthdays of historical figures or learning more about whatever holiday it is today, these search highlights are a distraction that gets in the way of what the search box is supposed to do: direct you to a file or app.
To disable Search Highlights:
1. Click in the search box.
2. Select Search settings from the … menu.
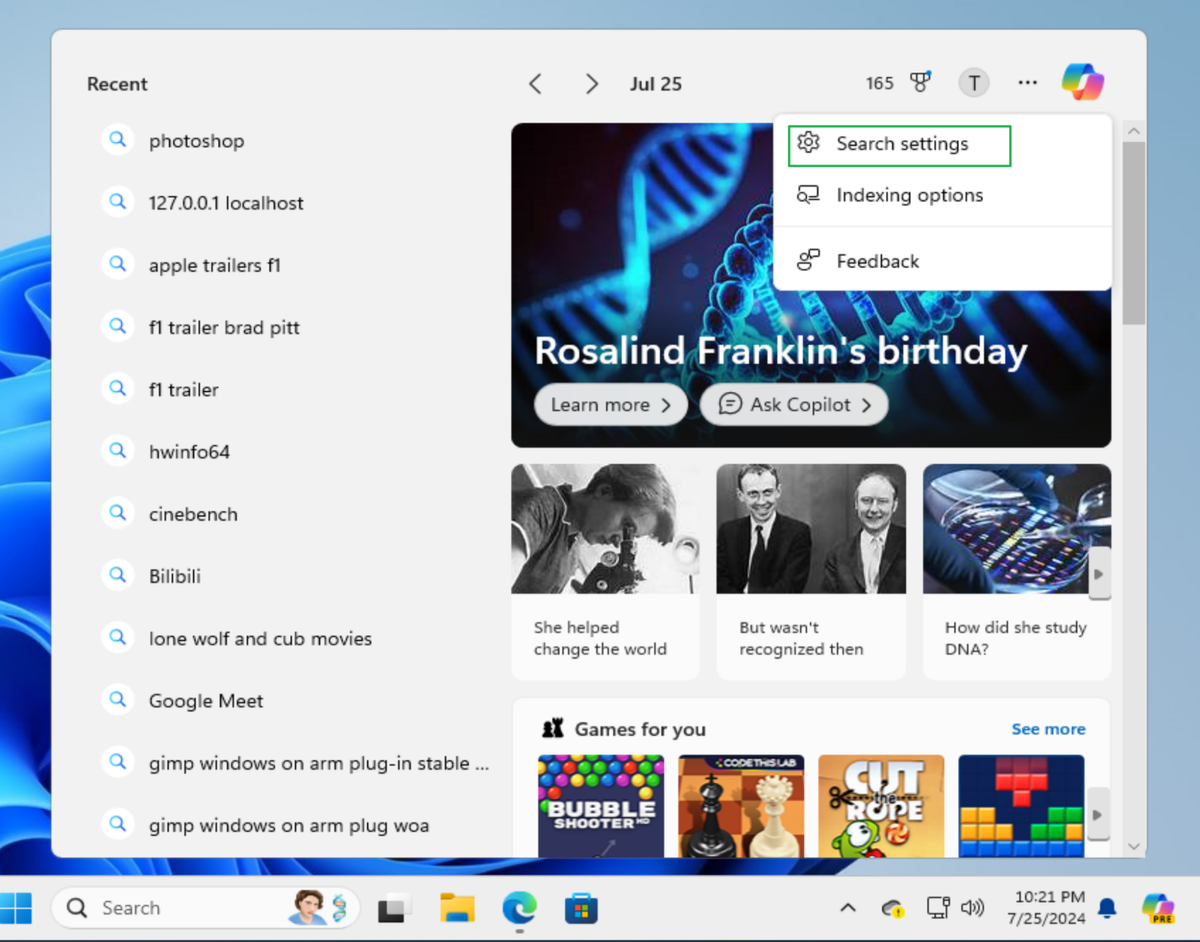
3. Toggle “Show search highlights” to off.

Remove Web Results from Windows Search
5. Remove Web Results from Windows Search

The Windows search box is very helpful when you want to find a file or an application. It’s even helpful if you want to find out whether you have a program installed or not. But unfortunately, by default, Microsoft pollutes the results with web links or suggestions from the web. For example, I had an MP3 file named “andrew-noisy” that I was searching for. Good news: Windows 11 found it when I searched for “andrew.” Bad news: It also suggested I search for famous people named Andrew and it took processing power and bandwidth to get those suggestions.
But wait. There’s more! If I search for “mp3 files,” I get a web result that tells me what an MP3 file is rather than a list of my mp3 files (searching for *.mp3 was better). But web results are a waste of time here. If I wanted to search the web, I’d open my browser and go straight to Google or Bing.

To stop web results from mucking up Windows search:
1. Open Regedit. You can get there by searching for “regedit.”
2. Go to HKEY_CURRENT_USER\Software\Policies\Microsoft\Windows

3. Create a new key called Explorer.
4. Within Explorer, Create a new DWORD (32-bit) registry value called DisableSearchBoxSuggestions and set its value to 1

5. Reboot.
These changes won’t get rid of all of the annoyances and distractions Windows 11 has in store for you. But it will restore some of your time and focus.
More Windows Tutorials
#worst #Windows #distractions #stop